Force Matrix Overview
The Force Matrix gives you manual control over your Cablecast system. While Cablecast automates most channel operations through scheduling and Autopilot, the Force Matrix lets you manually route sources, play shows, record content, and play network streams in real time.
Note: For most live event workflows, we recommend using Control Rooms instead of the Force Matrix. Control Rooms are the successor to the Force Matrix and offer more flexibility, including the ability to build focused interfaces with only the devices and outputs needed for a specific event, and Macros that let you start or end a live event in a single click. See Getting Started with Control Rooms to learn more.
Navigating to the Force Matrix
Go to Autopilot → Force Matrix in the left-hand menu.

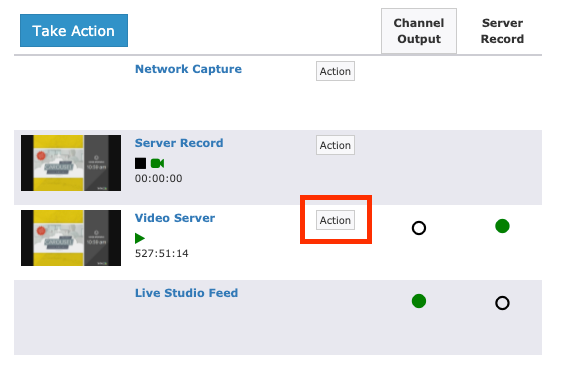
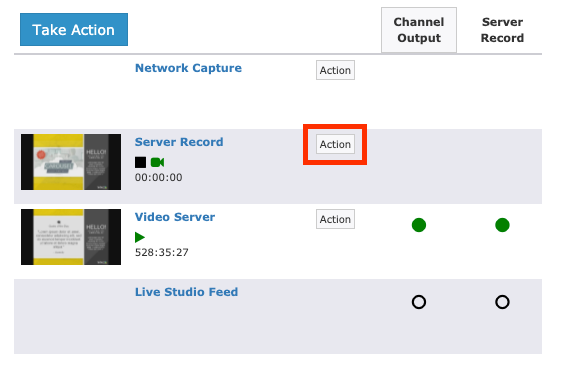
Force Matrix layout
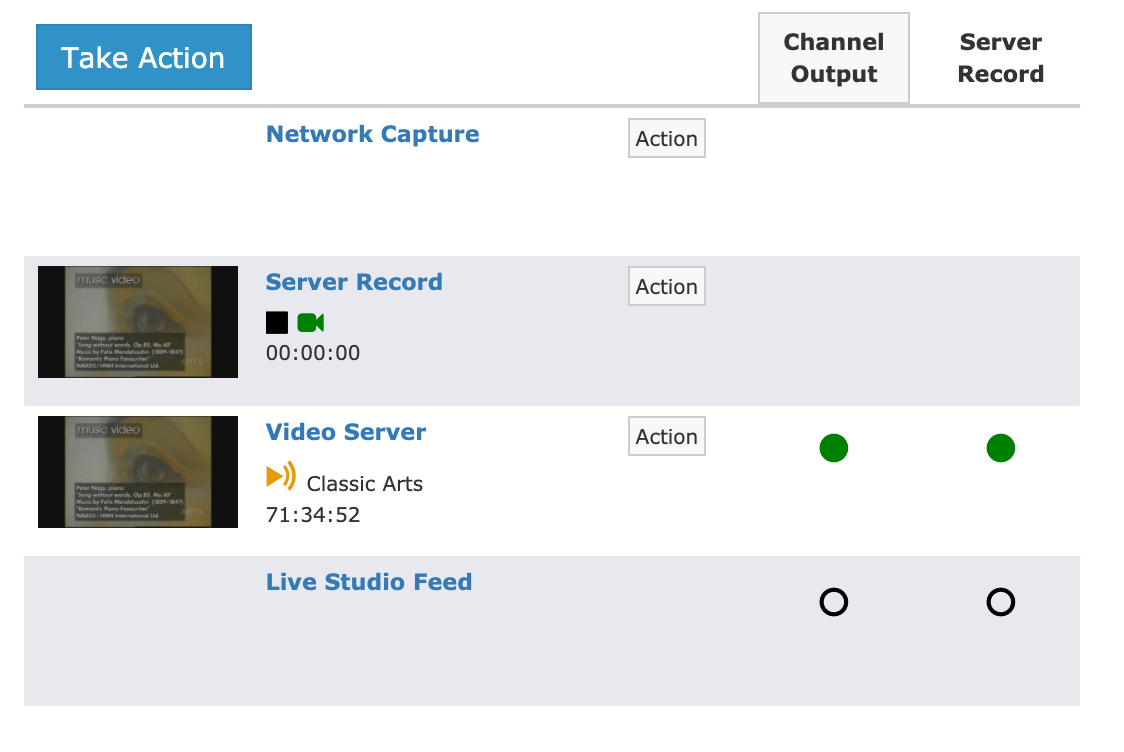
The Force Matrix is organized as a grid. Sources (your devices and inputs) are listed along the left side. Outputs (your destinations, such as a channel output or record device) run across the top.
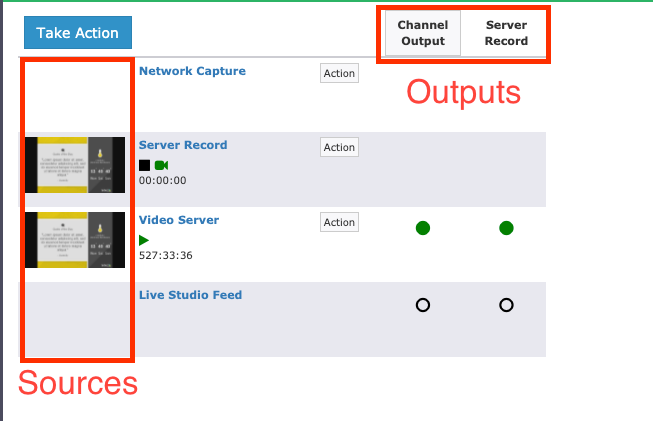
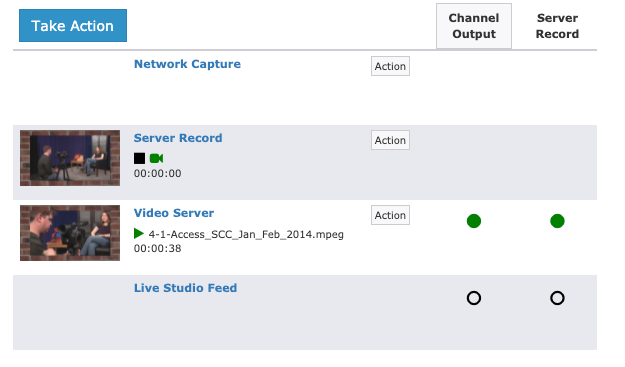
Green dots indicate where each source is currently being routed. For example, if the video server has green dots to the right of it under both Channel Output and Server Record, it is currently being sent to both destinations.
On larger systems with many sources and outputs, the grid can become difficult to navigate. Use the toggle button in the lower-right corner of the window to switch between the expanded and compact views.


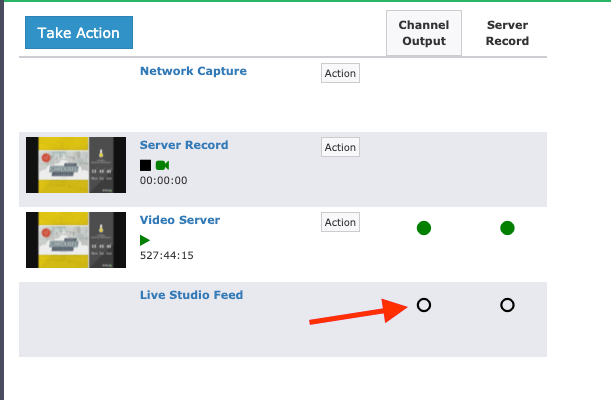
Routing a source
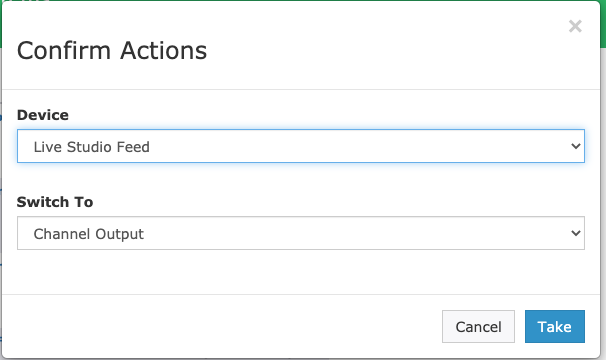
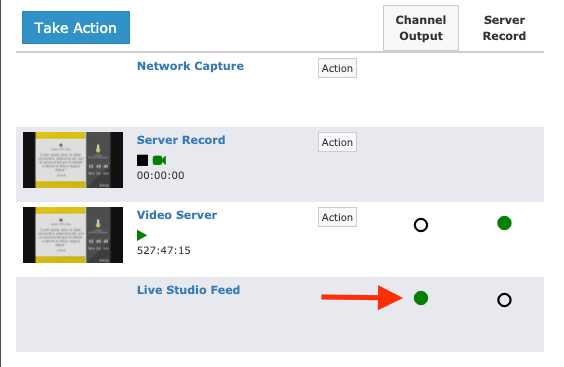
To manually route a source to a destination, click the dot at the intersection of that source and destination. A confirmation window opens asking you to verify the routing change. Click Take to confirm. The green dot updates to reflect the new route.
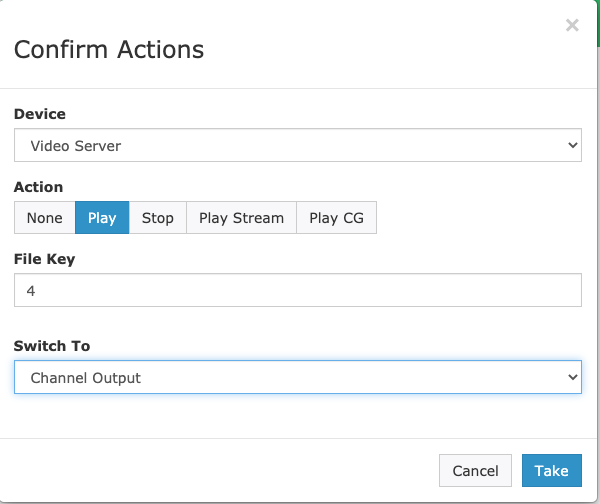
Manually playing a show
To manually play a show from your server:
Click Action for the server output you want to use.
In the confirmation window, set Action to Play.
In the File Key field, enter the file name of the show you want to play.
Under Switch To, select the destination you want the show routed to (for example, Channel Output).
Click Take.
The show begins playing and routes to the selected destination.
Note
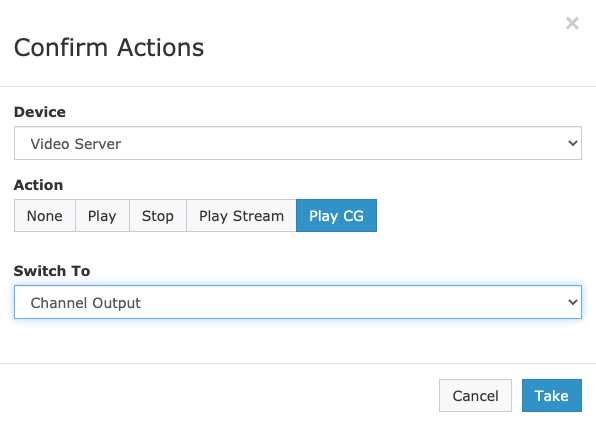
If you manually play a show in the Force Matrix, the channel does not return to bulletin board automatically when the file finishes. You need to manually route back to bulletin board or use the Play CG action described below.
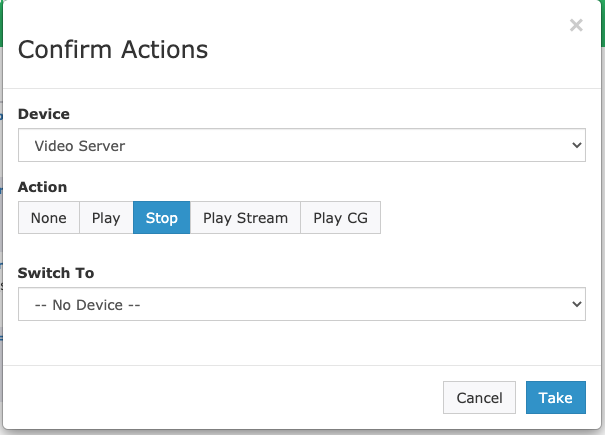
Stopping playback and playing CG
To stop a show that is currently playing, click Action for the server output, set Action to Stop, and click Take. You can also route to a different source at the same time if needed.
If your system includes Cablecast CG, you can force the output back to CG by clicking Action for the server output, setting Action to Play CG, optionally selecting a destination under Switch To, and clicking Take. If your system uses a standalone CG server, CG appears as its own device in the Force Matrix and can be routed directly to the desired output using the routing steps above.
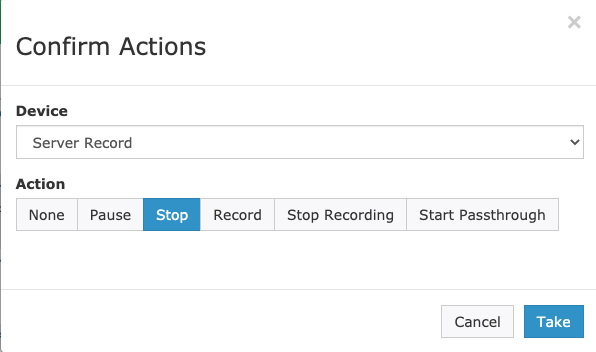
Manually recording
To manually start a recording:
First, make sure the source you want to record is routed to your server's record device. Use the routing steps above if needed.
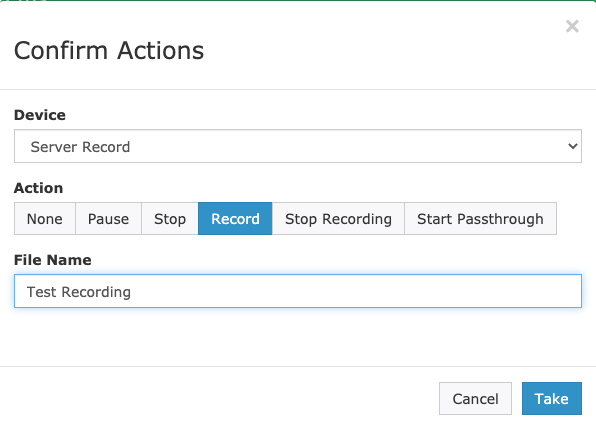
Click Action for the server record device. The Record action is selected by default.
Enter a File Name for the recording so you can identify it later. If you leave this blank, Cablecast names the file using the format
Unnamed-Record-Date-Time.Click Take to start recording.
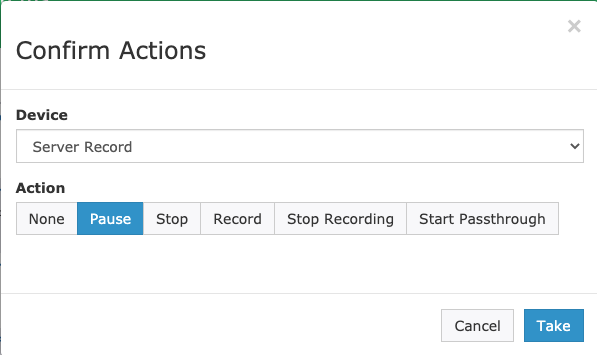
Once recording is underway, you have two options:
Pause — Useful when a meeting goes into closed session. Pausing keeps everything in a single file rather than splitting it into multiple recordings. Click Action, select Pause, and click Take. To resume, click Action again, select Record, and click Take. You do not need to re-enter the file name.
Stop — Click Action for the server record device. Stop is selected automatically. Click Take.
When the recording stops, Cablecast processes the file and places it in the Unlinked filter in Assets.
Manually playing a network stream
You can also use the Force Matrix to manually play a network stream you have already configured. Network streams must be set up in Settings → Location Settings → I/O → Network Streams before they can be used here. For setup details, see Setting Up Cablecast to Use a Network Stream.
To play a stream:
Click Action for the server output you want to use.
In the confirmation window, set Action to Play Stream.
Select the stream you want to play from the dropdown.
Under Switch To, select your desired destination.
Click Take.
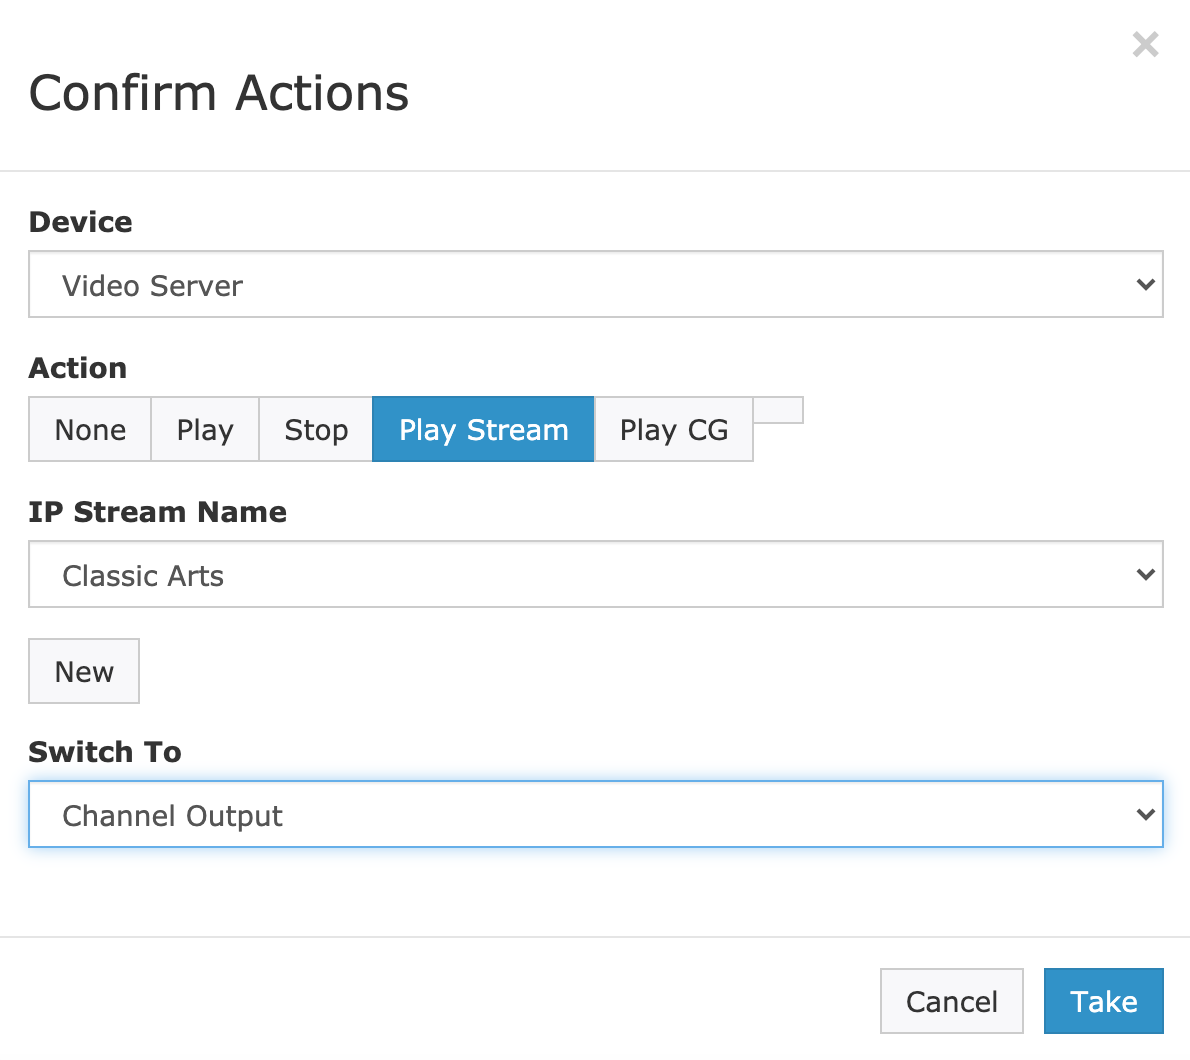
The stream begins playing from the selected server output. The stream continues playing until you stop it manually using the Stop or Play CG actions described above, or until the next scheduled program starts. If you need the stream to continue uninterrupted through scheduled programming, use the Override option on the channel output.
For information on recording a network stream, see:
