Live 600/700 Series Setup Guide
Note
This guide covers the setup and configuration of Cablecast Live 600 and 700 Series servers. If you have a Live 800 Series server, see LIVE 800 Documentation instead.
Introduction
The Cablecast Live server allows you to create an HLS web stream of your channel that you can share with your viewers online. This server is typically a component of a full Cablecast system.
This guide walks you through three parts of the setup process: Physical Setup, Software Setup, and Testing.
Prerequisites
Before beginning the installation and configuration, make sure you have the following resources available:
An ethernet network connection
A keyboard, mouse, and a VGA monitor
An SDI signal of the channel you are live streaming
Part 1: Physical Setup
You'll learn about the physical connections on the Cablecast server and how to tie it into your existing infrastructure.
What's in the Box
Your Cablecast server should come with the following items:
AC power cable — powers the Cablecast server
Server — the Cablecast server itself
Physical Connections
On the back of your Cablecast server, you'll see several ports. Refer to the diagram below for connections on your Live server.
All Cablecast servers share some basic system connections:
Connect a keyboard and mouse via the USB ports.
Connect a monitor. The monitor is required for server setup, and we recommend that it remain connected. All Cablecast servers have at least a VGA port, which is what we recommend connecting to the KVM in your rack.
Connect the Cablecast server to the network via one of the ethernet network jacks.
Connect the Cablecast server's power supply to an AC power source using the provided AC power cable.
Next, connect the Cablecast Live server to the SDI signal of your channel. This is usually the same signal you are sending to your cable provider. Typically you can get this signal in a few different ways:
Use a Distribution Amplifier to split the signal to two final destinations.
Use your AV routing switcher and set up router loopbacks.
Use the Mirrored Output feature.
For questions about these options, reach out to Cablecast Support at support@cablecast.tv.
FIGURE 1: The Cablecast Live

AC Power
RS232 COM port (male)
USB 2.0
USB 3.0
Ethernet
VGA
SDI Video In
Powering On
Once your Cablecast server is connected, power it on by pressing the power button on the front of the unit. The unit will boot and go through Windows System Preparation steps. You will need to create a Windows username and password.
Important
Note your Windows username and password in a safe place. Cablecast Support cannot recover credentials other than by reimaging the system.
Once you are in Windows, you'll be ready for I/O configuration (if needed) and Cablecast software setup.
Part 2: Software Setup
Tip
With a new Cablecast system, a commissioning appointment is included. A member of the Cablecast Customer Support team will assist with the initial configuration and testing of your new server. We strongly encourage all customers to work with Cablecast Support when installing a new server. They can be reached at support@cablecast.tv.
The steps below assume you already have the rest of your Cablecast system set up and working. Only the steps for adding and configuring your new Live server are covered here.
Adding the Live Server
Note
If your system includes video servers, configure those before adding your Live server. The Live server configuration requires an existing Channel output to link to, so the video servers need to be set up first.
Cablecast will automatically discover your Live server on the network once it is powered on and connected. For full instructions on adding and configuring it, see the Configuring a Live Server section of the Configuring New Cablecast Servers article.
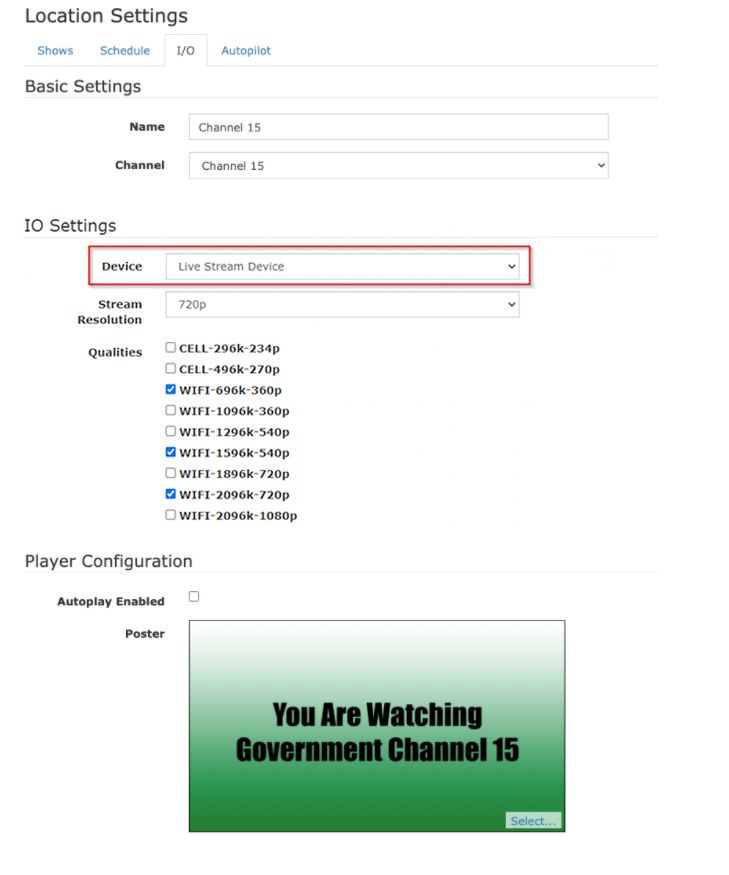
Live Streaming Setup
Go to Settings > Location Settings > I/O Tab > Live Streaming. Click New to create a new stream, then click the name of the stream you just created to edit it.
Name your stream.
From the Channel dropdown, select the channel this stream is for.
In the Device dropdown, select the Live Streamer Device you created in the previous step.
Select the Stream Resolution for the desired playout resolution. This should generally match the highest resolution of the source material being used on the server.
Choose the number of Qualities to support adaptive bitrate HLS stream playback. We recommend choosing 3, which limits the stream and bandwidth your Cablecast system needs to create the different versions.
Under Player Configuration, check the Autoplay Enabled checkbox if you want your live stream to autoplay when someone visits your page. Note: Autoplay is not guaranteed to work on all devices and browsers. Be aware that autoplaying video with audio may create barriers for some users and could conflict with WCAG 1.4.2 (Audio Control).
You can also upload a Poster image that will be displayed in the player window when the stream is not playing. Click Select... in the bottom right of the image field to locate the file on your computer. We recommend making the image the same size as the Stream Resolution you selected.
Click Save when finished.
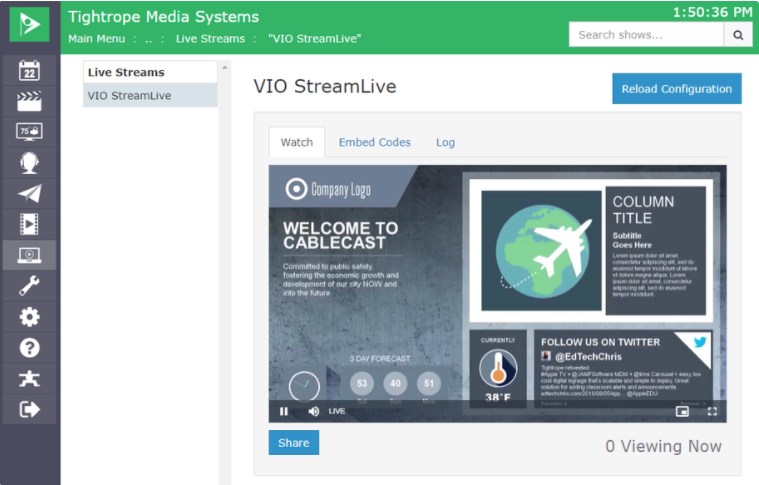
Part 3: Testing and Sharing Your Live Stream
Now that your live stream is configured, you can start it and test it.
Go to Internet Video > Live Streaming and select the stream you just created. This gives you a preview window to watch your stream, as well as a tab with the embed code for your stream.
As always, take full advantage of Cablecast Customer Support during the initial setup and configuration of any new Cablecast system.
