Closed Captioning with Cablecast Cloud Services
Overview
Cablecast Cloud Services provides a fully cloud-based captioning solution that lets you caption both live and pre-recorded content without additional hardware. This is a paid feature available on Flex and VIO series servers. Pricing is based on minutes used, and you can purchase bundles of minutes to load into your account.
This article walks you through setting up online (live) and offline (file) captioning, configuring captioning for Network Streams, and managing caption settings, including custom vocabularies.
Note: Since this is a cloud-based solution, your server must be able to reach certain web addresses. See Cablecast Services to Allow to make sure your captioning works properly.
Understanding Online vs. Offline
Captioning in Cablecast uses two terms to describe different workflows:
Online captioning generates captions in real time for live content — for example, encoding a city council meeting or a live sports broadcast.
Offline captioning transcribes captions for existing files already on your server — for example, a taped studio show or a previously recorded meeting.
Online (Live) Captioning
Online captioning is the real-time transcription of audio during live events such as meetings, studio shows, or sports broadcasts.
Cablecast Live Captions Overview
Scheduling captioning
You can schedule a show playout to enable live captioning in just a few steps.
Note: Live captioning must come through a configured encoder on the Cablecast system.
Go to your Schedule.
Find or schedule your live event.
Select the Edit Run button.
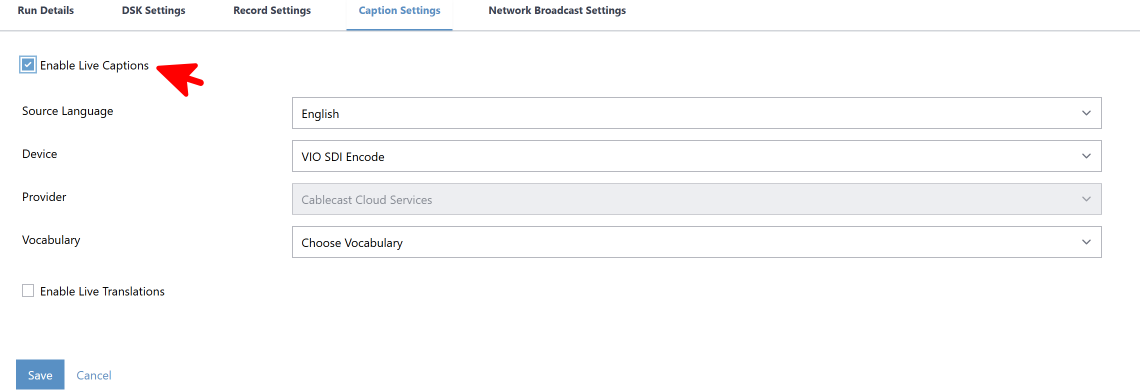
In the Run Details panel on the right, turn on Enable Live Captions and select the encoder.
Select Save.
Send Autopilot.
Note: If you schedule your live event to run longer than the event will actually last, you'll need to manually stop the transcription in the Force Matrix when the feed ends. Select Action next to the encoder, choose Stop Transcribing, and select Take. If this step is not completed, the caption job will continue until the scheduled end time.

Starting Transcription via Control Rooms
For last-minute or unscheduled events, you can start live captioning directly from Control Rooms.
Tip: All of the steps below can be automated using a macro. See our knowledge base article on Control Room Macros to set up a one-click or keyboard shortcut workflow.
Starting Captions Manually
In Control Rooms, route your live source to your encoder.
Select Action next to the encoder and choose Start Transcribing.

Select your source language and select Take.

Select Action on the encoder again and choose Start Passthrough.
Select your server output and select Take.

Important
Do not route your live source directly to the channel output. The caption data is applied by the Cablecast server, so the signal must pass through the server before reaching your channel.
Confirm that your video server output is routed to the channel (it may already be).

Optionally, you can also record the event: select Action on the encoder, choose Record, enter a file name, and select Take.

Ending a Caption Job
When your event is over, stopping your encoder or recording will automatically stop captions as well (Cablecast 7.10+). If you were not recording the event, click Actions next to the encoder and choose Stop Transcribing.
After stopping, route your bulletin board or CG output back to the channel as you normally would:
Standalone CG server: Select the radio button next to the CG server device under your channel output to route it back to the channel.
CG outputting from the same server output: Select Action next to your video server output, choose Play CG, select your channel output, and select Take. The passthrough will stop, and CG will resume on that output.

Online (Live) Captions With Network Streams
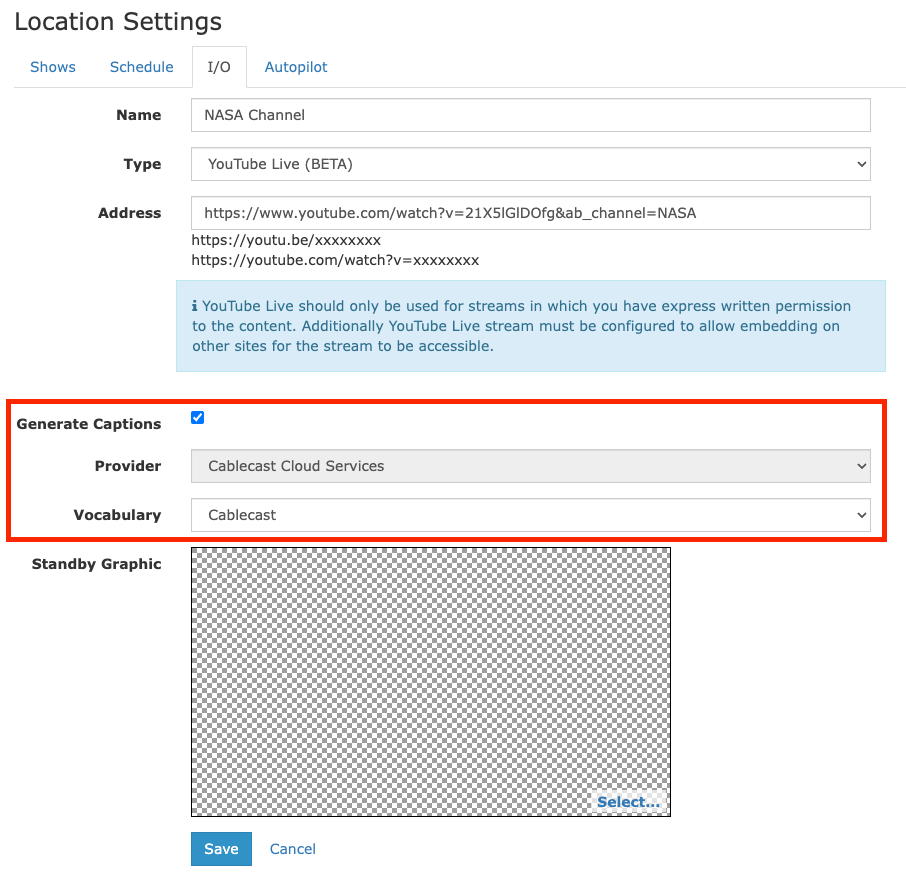
You can also enable live captioning for Network Streams in Cablecast. Captions must be configured within each individual Network Stream during its setup.
If captions are enabled in the Network Stream configuration, they will always be active for that stream whenever it is scheduled, manually routed, or recorded. To disable captions, you must turn them off in the Network Stream configuration before bringing the stream into Cablecast again.
Go to Settings > Location Settings > I/O > Network Streams.
Create a new stream or edit an existing one.
Near the bottom, select the Generate Captions checkbox.
Set your Caption Provider and Vocabulary.
Select Save.
Once configured, you can enable live captioning on Network Stream shows using the same steps described in the Scheduling Captioning section above.
Offline (File) Captioning
Enabling Captioning
You can send an existing file for captioning from within the Show Record. Cablecast will extract the audio, transcribe it in the cloud, and return the captions file to your system.
Open the Show Record for the program you want captioned and edit the show.
Select the Text Tracks tab at the top of the Show Record.

Turn on Auto Generate Captions.
Optionally, select Settings to adjust the following:
Vocabulary: Apply a custom vocabulary set, if applicable.
Primary Language: Sets the language of the captions (typically English).

Select Save.
After saving the show record, the Cablecast system will start a “Captioning Job” to process captions on the file. Once complete, captions can be managed from the Text Tracks tab of the Show Record or from the Text Tracks section of Cablecast in the left-hand menu (the CC icon).

Reprocessing Captions
If a caption job fails, you can retry it. Check the error description before retrying to understand what went wrong. If a caption job repeatedly fails, contact the Cablecast Support team.
Note
Resubmitting a caption job will generate new caption files via Cablecast Cloud Services and will be billed per minute used.
Note: You can only retry caption jobs for the Cablecast Cloud Services provider. For third-party caption solutions, refer to your device's documentation.
Via Show Record
Open the Show Record, go to the Text Tracks tab, and select Retry on the failed caption job.
Via Text Tracks UI
Go to Text Tracks in the left-hand menu, search for the show, and retry the caption job from there.
Custom Vocabularies & Acronyms
Custom vocabularies help Cablecast's automatic speech recognition (ASR) correctly caption words it wouldn't otherwise recognize — names, places, acronyms, or station-specific terms. You can group related phrases into a vocabulary (for example, "Board Member Names" or "Local Landmarks") and reuse it across captioning jobs.
This feature applies to Cablecast Cloud Services captioning only. If you use a third-party captioning device, see that device's documentation instead.
Finding vocabularies
Go to Main Menu > Settings > System Settings > Vocabularies.


Display As and Sounds Like
Each phrase in a vocabulary has two parts:
Display As — the spelling that appears in the finished captions.
Sounds Like — a phonetic hint that tells the ASR how the word is actually pronounced.
You can add more than one Sounds Like entry for the same Display As to cover different pronunciations of the same word.
Example: Display As Tacoma, Sounds Like tuh-ko-muh.
Formatting rules for phrases:
50 characters maximum per field.
Display As allows letters, digits, spaces, periods, hyphens, and apostrophes.
Sounds Like allows the same characters minus digits; periods are only allowed when spelling out acronyms or titles.
Commas are not allowed in either field and will trigger an invalid character error.
Creating a new vocabulary
On the Vocabularies page, select Create New Vocabulary.
Enter a descriptive Vocabulary Name (for example, "Town Names" or "Board Member Names").
Under Add New Phrase, enter a Display As value and a Sounds Like value, then select + Add. Repeat for each phrase you want in this vocabulary — added phrases appear in the Phrases list below the form.
When you're done adding phrases, select Create Vocabulary to save, or Cancel to discard the vocabulary.

Editing an existing vocabulary
Select the pencil icon next to any vocabulary in the list to reopen it. From here you can:
Add more phrases using the same Add New Phrase panel.
Remove a phrase by selecting the trash icon next to it in the Phrases list.
Rename the vocabulary.
Select Save Changes when you're done, or Cancel to discard your edits.
Do Not Translate
Each vocabulary in the list has a Do Not Translate toggle. Turning this on excludes that vocabulary's terms from translation — but note that it does not add those terms to your station's global Do Not Translate list. Use the toggle when you want a term spelled consistently in captions without also blocking it from translation everywhere else.
Importing and exporting vocabularies with CSV
You can now manage vocabularies in bulk using CSV files:
Select Export CSV to download all of your station's vocabularies at once.
Select Import CSV to add or update vocabularies from a file. The CSV needs four columns:
vocabulary_name,display_as,sounds_like, anddo_not_translate. Rows that share the samevocabulary_nameare grouped into a single vocabulary, and multiple Sounds Like rows can map to the same Display As. If a vocabulary with that name already exists, new phrases are appended to it (any exact duplicates are skipped).If you're starting from scratch, select Template in the Import dialog to download a sample CSV with the expected columns already in place.
Schedule and Control Room Indicators
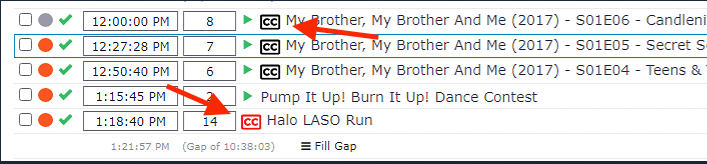
Cablecast displays closed captioning icons in the Schedule and Control Rooms to show caption status at a glance.
Schedule
Black CC icon: The Show Record or file has caption files present.
Red CC icon: The show will be captioned live.
Control Rooms / Force Matrix
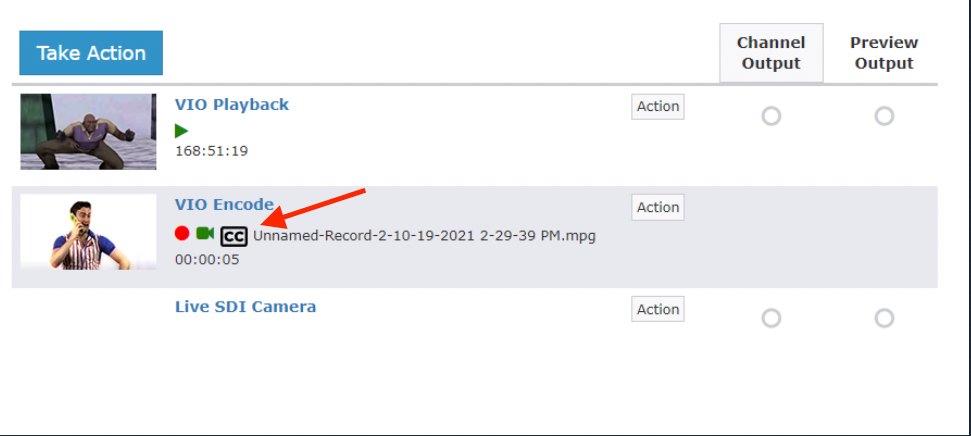
A black CC icon appears next to a source when it supports captioning.